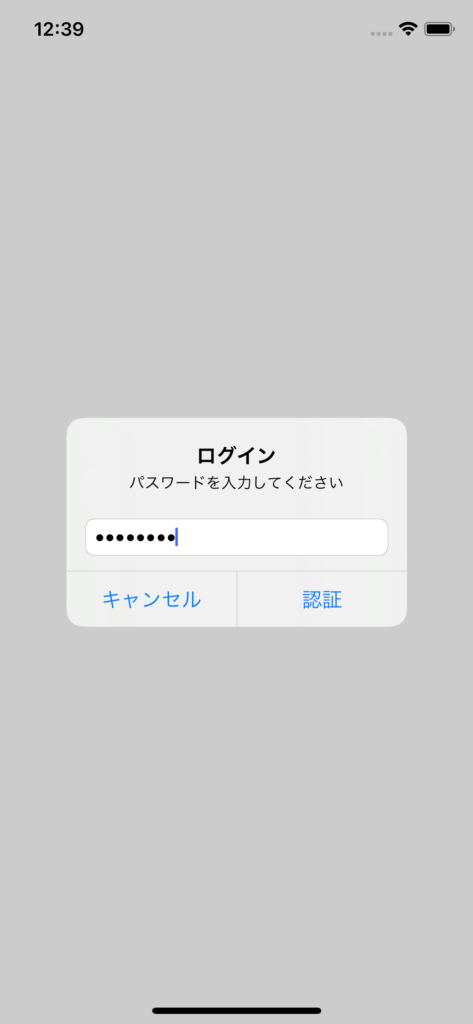
今回は、以下のような TextField(SecureField) を備えた Alert を作って見たいと思います。
こちらの記事を参考に作成しました。
TextField付きAlertを表示する
残念ながら、2021/01/08 時点で SwiftUI の純粋な機能では Alert 自体に TextField を追加するプロパティはありません。
そのため、例に漏れず UIViewControllerRepresentable プロトコルを継承して、UKit の UIAlertController をラップしたViewを作成することになります。
早速、作成したコードを紹介します。
TextFieldAlertView
import SwiftUI

struct TextFieldAlertView: UIViewControllerRepresentable {

    @Binding var text: String
    @Binding var isShowingAlert: Bool

    let placeholder: String
    let isSecureTextEntry: Bool
    let title: String
    let message: String

    let leftButtonTitle: String?
    let rightButtonTitle: String?

    var leftButtonAction: (() -> Void)?
    var rightButtonAction: (() -> Void)?

    func makeUIViewController(context: UIViewControllerRepresentableContext<TextFieldAlertView>) -> some UIViewController {
        return UIViewController()
    }

    func updateUIViewController(_ uiViewController: UIViewControllerType, context: UIViewControllerRepresentableContext<TextFieldAlertView>) {

        guard context.coordinator.alert == nil else {
            return
        }

        if !isShowingAlert {
            return
        }

        let alert = UIAlertController(title: title, message: message, preferredStyle: .alert)
        context.coordinator.alert = alert

        alert.addTextField { textField in
            textField.placeholder = placeholder
            textField.text = text
            textField.delegate = context.coordinator
            textField.isSecureTextEntry = isSecureTextEntry
        }

        if leftButtonTitle != nil {
            alert.addAction(UIAlertAction(title: leftButtonTitle, style: .default) { _ in
                alert.dismiss(animated: true) {
                    isShowingAlert = false
                    leftButtonAction?()
                }
            })
        }

        if rightButtonTitle != nil {
            alert.addAction(UIAlertAction(title: rightButtonTitle, style: .default) { _ in
                if let textField = alert.textFields?.first, let text = textField.text {
                    self.text = text
                }
                alert.dismiss(animated: true) {
                    isShowingAlert = false
                    rightButtonAction?()
                }
            })
        }

        DispatchQueue.main.async {
            uiViewController.present(alert, animated: true, completion: {
                isShowingAlert = false
                context.coordinator.alert = nil
            })
        }
    }

    func makeCoordinator() -> TextFieldAlertView.Coordinator {
        Coordinator(self)
    }

    class Coordinator: NSObject, UITextFieldDelegate {

        var alert: UIAlertController?
        var view: TextFieldAlertView

        init(_ view: TextFieldAlertView) {
            self.view = view
        }

        func textField(_ textField: UITextField, shouldChangeCharactersIn range: NSRange, replacementString string: String) -> Bool {
            if let text = textField.text as NSString? {
                self.view.text = text.replacingCharacters(in: range, with: string)
            } else {
                self.view.text = ""
            }
            return true
        }
    }
}
引数(プロパティ)
6個〜10個の引数を指定できるようにしました。
- text:入力文字列とバインディングする状態変数(@State or @Publish)を指定します
- isShowingAlert:表示トリガーとなる状態変数(@State or @Publish)を指定します
- placeholder:プレースホルダーを指定します
- isSecureTextEntry:文字を●表示する場合は true にします
- title:タイトルを指定します。
- message:タイトルのしたに表示するメッセージを指定します
- leftButtonTitle:左側ボタンの文字列を指定します(任意)
- rightButtonTitle:右側ボタンの文字列を指定します(任意)
- leftButtonAction:左側ボタンの押下時のアクションを指定します(任意)
- rightButtonAction:右側ボタンの押下時のアクションを指定します(任意)
使用例
struct ContentView: View {

    @State private var isShowingAlert = true
    @State var text: String = ""

    var body: some View {
        Button("タップしてアラート表示") {
            isShowingAlert = true
        }
        TextFieldAlertView(
            text: $text,
            isShowingAlert: $isShowingAlert,
            placeholder: "",
            isSecureTextEntry: true,
            title: "ログイン",
            message: "パスワードを入力してください",
            leftButtonTitle: "キャンセル",
            rightButtonTitle: "認証",
            leftButtonAction: nil,
            rightButtonAction: {
                print("パスワード認証リクエスト")
            }
        )
    }
}
一例ですが、セキュアな処理実行前のユーザー再認証(パスワード入力)などに使えると思います。
筆者は Firebase のパスワード変更リクエストの際に再認証要求が返ってきた場合に表示する、という用途に利用しました。
以上


[…] 参考になる記事 >>> https://www.yururiwork.net/archives/1315 […]