先日の記事に続いて今回はパスワード入力用のTextFieldについても作成してみましたのでご紹介します。作り方は要件によって様々ですのであくまで参考程度です。
flutter doctor 実行環境
[✓] Flutter (Channel stable, 3.3.10, on macOS 13.1 22C65 darwin-x64, locale ja-JP)
[✓] Android toolchain – develop for Android devices (Android SDK version 30.0.3)
[✓] Xcode – develop for iOS and macOS (Xcode 14.2)
[✓] Chrome – develop for the web
[✓] Android Studio (version 2020.3)
[✓] VS Code (version 1.74.3)
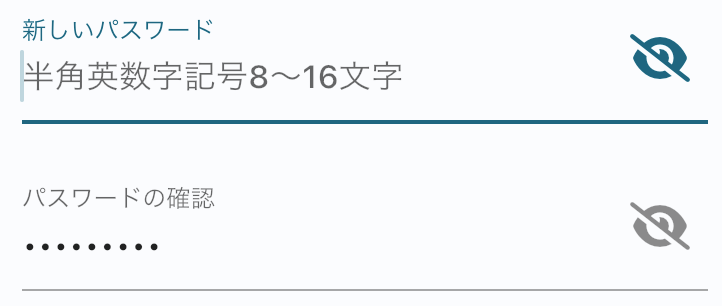
パスワード入力用のTextFieldを作る
PasswordTextField クラス
パスワードの可視化、非可視化を制御するために StatefulWidget としています。
import 'package:flutter/material.dart';
import 'package:font_awesome_flutter/font_awesome_flutter.dart';

class PasswordTextField extends StatefulWidget {
  final TextEditingController controller;
  final String? labelText;
  final String? hintText;
  final int? maxLength;
  final TextInputAction? textInputAction;
  final void Function(String)? onChanged;
  final void Function(String)? onSubmitted;
  final void Function(bool)? onFocusChange;

  const PasswordTextField({
    super.key,
    required this.controller,
    this.labelText = 'パスワード',
    this.hintText,
    this.maxLength,
    this.textInputAction,
    this.onChanged,
    this.onSubmitted,
    this.onFocusChange,
  });

  @override
  State<PasswordTextField> createState() => _PasswordTextFieldState();
}

class _PasswordTextFieldState extends State<PasswordTextField> {
  bool _obscureText = true;

  @override
  Widget build(BuildContext context) {
    return Focus(
      onFocusChange: widget.onFocusChange,
      child: TextField(
        controller: widget.controller,
        decoration: InputDecoration(
          labelText: widget.labelText,
          hintText: widget.hintText,
          suffixIcon: GestureDetector(
            child: Icon(_obscureText ? FontAwesomeIcons.solidEyeSlash : FontAwesomeIcons.solidEye),
            onTap: () => setState(() => _obscureText ^= true),
          ),
        ),
        obscureText: _obscureText,
        autocorrect: false,
        enableInteractiveSelection: false,
        maxLength: widget.maxLength,
        textInputAction: widget.textInputAction,
        onChanged: widget.onChanged,
        onSubmitted: widget.onSubmitted,
      ),
    );
  }
}
PasswordTextField の引数
final TextEditingController controller;- Pageなどで宣言したコントローラーを指定します。
final String? labelText;- タイトルラベルを指定します。
final String? hintText;- プレースホルダーの文字列指定です。
final int? maxLength;- 入力最大文字数の指定です。null で無限になります。
final TextInputAction? textInputAction;- ソフトウェアキーボードのDoneボタンの種類を指定します。
final void Function(String)? onChanged;- 1入力単位での変更を検知します。バリデーションなどに使えます。
final void Function(String)? onSubmitted;- Doneボタンなどでの入力確定を検知します。
final void Function(bool)? onFocusChange;- フォーカスされた時や外れた時のイベントを検知できます。
内部TextFieldの設定
decoration: InputDecoration で受け取ったlabelText 及びhintText をセットしています。
また、パスワードの可視化・不可視化を変更するアイコンボタンとしてsuffixIcon: GestureDetector がセットされています。目のアイコンについてはIcons で適切なものが見つからなかったため※今回はFontAwesomeを利用させてもらいました。もちろん自前で用意しても良いと思います。
https://pub.dev/packages/font_awesome_flutter
$ flutter pub add font_awesome_flutterタップする度にobscureText: _obscureText の真偽値が反転するようになっています。
※追記
後ほどIcons.visibility というアイコンがあることを知りました。。。
パスワードの入力ですので、autocorrect: false で自動修正は不可にし、enableInteractiveSelection: false でコピペを防いでいます。
使用例
簡易的ですが使用例です。実際はパスワード変更画面などで「現在のパスワード」「新しいパスワード」などと組み合わせて利用すると良いと思います。
class SignUpPage extends StatelessWidget {
  final _passwordController = TextEditingController();

  @override
  Widget build(BuildContext context, WidgetRef ref) {
    return Scaffold(
      body: PasswordTextField(
        controller: _passwordController,
        textInputAction: TextInputAction.next,
        onChanged: (value) {
          _validate(value);
        },
        onFocusChange: (hasFocus) {
          if (!hasFocus) {
            フォーカスが外れた時...
          }
        },
      ),
    );
  }

  void _validate(String password) {
    // 何かバリデーションを行ったりする...
  }
}
以上